Paper Doll System
Introduction
The Paper Doll System is a software-based concept inspired by traditional paper dolls. It emulates the essence of paper dolls, allowing users to interact with virtual doll-like figures. While it retains the charm of the original paper dolls, the software version introduces unique features and constraints, some of which are inherent to its stackable design.
Our implementation of the Paper Doll System takes a novel approach by integrating multiple systems into a unified platform. One standout feature is the division of images into multiple layers, facilitating the introduction of elements like colourable layers, individual object skin shading, matrix transformations, and other innovative functionalities. This combination of techniques enhances the versatility of the system, providing users with a dynamic experience in designing and interacting with their virtual dolls.
The Paper Doll System stands out as a key feature of the game due to its modular and expandable design. Its flexibility allows for easy integration of new elements, making it a framework that can continuously grow and evolve without worrying about compatibility.
Modules
The Paper Doll System has been thoughtfully divided into separate modules and submodules, a design choice that aims to enhance its usability and offer distinctive functionalities for each module. This approach simplifies the overall usage of the system, making it easier for the user to navigate and access specific features they need.
Doll
Doll module is responsible for organising and calling all other submodules to build the image. It also serves as a proxy to invoke methods that affect the displayed character such as equipping clothes, or changing facial expressions.
DollFace
This specific submodule holds control over character expressions and plays a key role in generating and caching face layers. Its responsibility revolves around storing and retrieving the necessary face layers to optimize performance and ensure a smooth experience.
Default layer types include:
- tears
- eyebrows
- pupils
- eyes
- mouth
- cheeks
DollBody
The dedicated submodule is tasked with the creation, storage, and preprocessing of both body and skin shading layers gathered from all currently equipped clothing, which will ultimately be presented through the main Doll module.
DollBodypart
The DollBodypart submodule bears resemblance to the DollCloth submodule but has several advantages over it. Its primary purpose is to define new body parts for the doll, and notably, it operates independently of the equipment systems, avoiding any interference with other modules.
Default layer types include:
- frame
- legs
- hips
- abdomen
- chest
- arms
- head
DollCum
Despite its unremarkable name, the DollCum submodule plays a crucial role in handling and presenting, well, cum layers, on the character. It enables the generation of dynamic renders that adapt to the character’s clothing and placement.
DollCloth
Undoubtedly the most commonly utilized submodule, DollCloth plays a pivotal role in managing and creating clothing items. It handles various aspects of the clothing, such as layers, colours, wardrobe icons, and more, making it an essential component of the system.
Default layer types include:
- makeup (multislot)
- accessory (multislot)
- piercing (multislot)
- tattoo (multislot)
- pubes
- stockings
- panties
- garterbelt
- bottom
- bra
- top
- gloves
- robe
- neckwear
- hair
- earrings
- glasses
- headgear
DollClothDynamic
It is a related submodule to DollCloth, with a slight difference. Dynamic clothes function as a tracker for another clothing item, enabling them to adjust themselves based on the currently equipped clothing object of the specified type. For instance, it allows the creation of a hat with different artwork depending on the character’s equipped hairstyle.
Layer types are shared with the DollCloth class.
DollMakeup
The DollMakeup submodule is a yet another sibling to the DollCloth submodule and follows the principles of DollClothDynamic implementation. However, unlike DollClothDynamic, it doesn’t keep track of clothing items. Instead, DollMakeup focuses on tracking facial expressions, enabling the addition of elements like lipsticks, eyebrow piercings, and other facial adornments.
Layers
Layer Types
There are several types of layers, each serving a distinct purpose:
- Colourable Layers (0-9): Layers starting with a number are colourable, allowing you to apply different colours to them.
- Outline Layer: This layer is used to display the outlines of an item and is placed on top of other layers.
- Skin Layer: The skin layer is used to showcase skin shadows and capture changes made to the body caused by the clothing piece. It is positioned directly on the body layer but beneath the face layers.
- Mask Layer: The mask layer is employed to crop out specific pixels below the parent clothing item. It is often utilized to conceal parts of items that might otherwise protrude.
- Overlay Layer: The overlay layer is utilized to display elements on top of all other layers, including outlines.
- Armfix Layer: The Armfix layer is designed to overlay an arm on top of the image when applicable. Further details about its functionality can be found in the limitations section.
Layer Modifiers
Layer modifiers can be applied to each layer type to customize their behaviour:
- Back Modifier: The back modifier dynamically adjusts the layer’s z-order, placing it 300 steps below the default z-order value for the object. This ensures the layer appears behind other elements in the scene.
- Front Modifier: Similar to the back modifier, the front modifier also affects the z-order. However, instead of lowering it, it increases the z-order by 300, pushing the layer to the front of the scene.
- Zorder Modifier: This modifier grants direct access to the layer’s z-order, allowing you to set it to any desired value. You can manually define the stacking order for precise control over the layer’s position.
Applying a layer modifier is as simple as adding it to the file name. For instance, you can do this by appending the modifier to the existing file name, like so:
1_front.webp
outline_zorder_55.webp
Please note the following:
- Multiple modifiers can be combined to achieve specific results and layer behavior adjustments.
- Zorder modifiers have the potential to override each other. When multiple zorder modifiers are applied to the same layer, only the last one will take effect.
- In the presence of modifiers, it is possible to have multiple layers of the same type coexisting.
- The availability of modifiers may vary across modules; not all modules support the same number of modifiers.
Artwork
Producing artwork for integration into the paper doll system involves specific criteria. Firstly, it is necessary to separate the lineart from the colours and any skin shading. Secondly, all colours should be placed on distinct layers, and shading should be done with a consistent hue without the use of the colour theory.
Specifications
Character artwork is produced at a resolution of 2020×2400 pixels, which is double the size utilized in the game files. This higher resolution facilitates the seamless integration of intricate details into the artwork. Typically, outlines are created using a brush size of 8, although adjustments can be made to achieve a sense of perspective. When exporting layers to the in-game resolution, it is advised to utilize the lanczos scaling to enhance sharpness and overall quality.
Layering
The following is an example of how the artwork file should be layered:
- Lineart: This layer contains the outline of the artwork, defining its shapes and forms.
- Colours: All the colours used in the artwork should be placed on separate layers.
- Skin Shading: If the artwork involves editing characters skin or adding shadows, their shading should be placed on a distinct layer.
- Additional Details: Any extra elements or intricate details in the artwork can be placed on separate layers for better organization and editing.
- Background: If there’s a background in the artwork, it should be placed on its own layer.
By maintaining this layered structure, the integration of the artwork into the paper doll system becomes more straightforward and allows for efficient customization and manipulation.
Below is a graphical depiction of a raster file featuring Hermione with a newly drawn ponytail hairstyle:
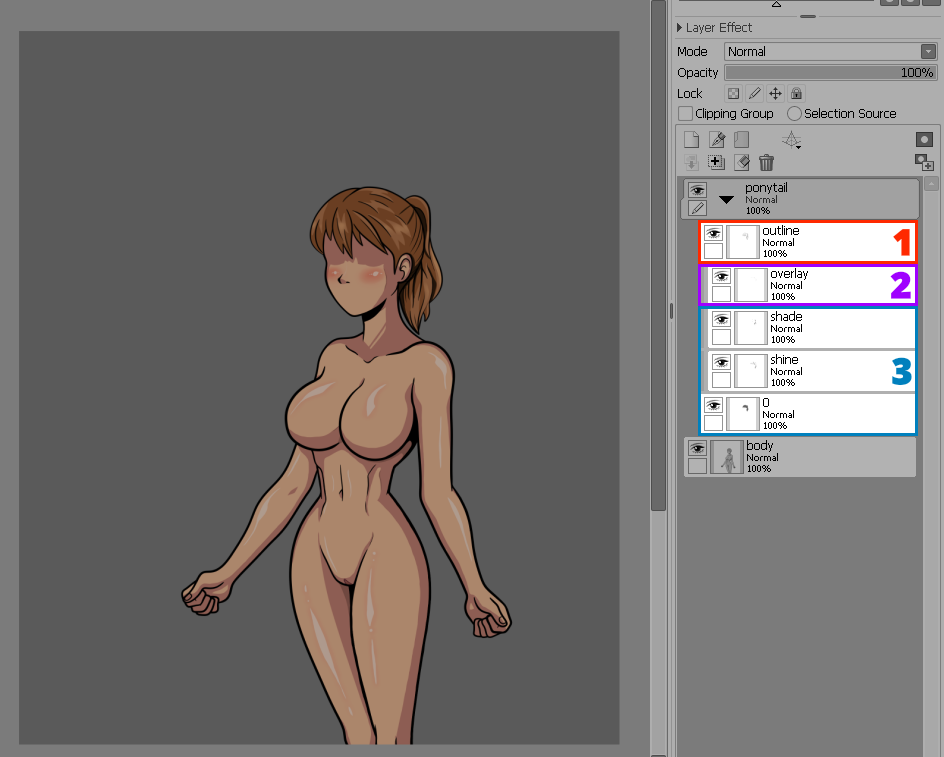
- Outline layer.
- Overlay layer.
- Colourable layer.
Now that you’ve understood the fundamentals of the layering requirement, there’s an additional step you must follow. It’s time to convert the items to greyscale to fully utilize the dye system for clothes.
Before proceeding, ensure to create a backup of your artwork file!
Automatic Greyscale Conversion
To perform automatic conversion to greyscale, simply place the non-greyscaled images into the mod directory. This action will automatically trigger the conversion process, transforming the images into greyscale versions.
Attention! Automatic conversion to greyscale might not always give accurate results. This means the final greyscale images might not look as good as you expect when you add colours onto them. The reason behind this is that automatic conversion doesn’t understand the details and complexity of the colours in the original image. It just tries to change them to greyscale based on some rules, but those rules might not work well for every image. As a result, using manual greyscale conversion, even though it requires more effort, is a better choice because you can carefully control and adjust the greyscale tones to ensure a high-quality outcome for your outfit that matches the artwork more closely. You can find more information about it in limitations section.
Manual Greyscale Conversion
The preferred approach for importing outfits into the game involves converting them to greyscale, even if it requires some additional manual effort. This method typically yields significantly better results compared to merely placing images in the directory and relying on automatic conversion.
To accurately convert your colorable layers into greyscale manually, follow these steps in a typical raster program:
- Open the raster program and load your artwork containing colourable layers.
- Select the specific layer you want to convert to greyscale.
- Locate the “Desaturate” or “Greyscale” option within the program. This function will remove the colour information from the selected layer, turning it into shades of grey.
- After greyscale conversion, adjust the brightness of the colourable layer until it reaches the maximum brightness possible without losing essential details. This step is crucial for applying colour matrices in OpenGL, ensuring colour accuracy is on good levels.
- Repeat this process for each colourable layer in your artwork to complete the greyscale conversion.
Limitations
Automated conversion of colours to greyscale may seem convenient, but it encounters several limitations due to the complexity of colour perception and representation. Here are the reasons why it can’t be reliably automated in all cases:
- Shades of Colours and Human Perception: Colours can have various shades, brightness levels, and saturation, which affect how they are perceived by the human eye. Automated processes lack the ability to understand the intricate nuances of colour perception, leading to inaccurate conversions that may not capture the intended visual impact.
- Loss of Information: Converting colours to a single shade of grey often results in loss of information and detail. Colours convey specific elements, emotions, and context in artwork, and the reduction to greyscale might lead to a loss of vital elements that contribute to the overall artistic expression.
- Non-Linear Colour Interaction: Colours in an artwork may interact in complex ways, and their transformation into greyscale requires careful consideration of their relationships. Automated systems might not account for these interactions, leading to erroneous results.
- Subjectivity and Artistic Intent: Artists use colours strategically to communicate ideas and evoke emotions. An automated process cannot grasp the artistic intent behind the colour choices, potentially altering the meaning and impact of the artwork.
- Human Creativity and Adaptability: Manual conversion allows artists to make creative decisions and adjust the greyscale tones according to the specific requirements of the artwork to function within the game. An automated process lacks the flexibility and adaptability that human creativity brings to the task.
- Colour Representation in Mathematics: Colours are typically represented in a three-dimensional colour space, involving attributes like hue, saturation, and brightness. Converting this multidimensional representation into a single greyscale value is mathematically challenging and cannot always yield accurate results.
- Contextual Understanding: Artworks often include elements with specific meanings, such as symbols or patterns. An automated system might not comprehend the contextual significance of these elements and may treat them inaccurately during conversion.
- Artistic Style and Technique: Different artists have unique styles and techniques that involve the use of colours in distinct ways. An automated process might not adapt well to these individual variations, leading to loss of colour representation on the final image.
Given these complexities and limitations, manual greyscale conversion remains the preferred method for artists seeking precision, control, and fidelity to their original vision. By carefully adjusting the greyscale tones, artists can ensure that their artwork maintains its integrity while maximizing compatibility with various applications, including the dye system for clothes in games or other interactive experiences.
How-To
Add a new clothing item
To add a new clothing item, start by adding the artwork for the clothing item following the file structure described earlier. Afterward, proceed to create a new object with the following parameters inside your script file:
- modpath: File path of the mod folder, typically the mod’s name.
- name: The character’s name.
- categories: The main category and subcategory of the item to be displayed in the wardrobe.
- type: The item type.
- id: The item identifier, or in other words, the name of the folder where the images are stored.
- unlocked: Specifies whether the item is unlocked by default (True) or is unlocked through other means (False).
- level: The character’s level required to wear this cloth.
- color: A Python list with default colours, specified in one of the formats listed below.
- zorder: The item’s z-order number, or None to use the default z-order for the slot.
- blacklist: A list of strings containing clothing types incompatible with this item.
Colour formats supported for color parameter:
- Hexadecimal: “#RRGGBB” or “#RRGGBBAA”
- RGB: (red, green, blue)
- RGBA: (red, green, blue, alpha) (alpha: 0 – fully transparent, 255 – fully opaque)
Kindly note that all parameters, with the exception of the color parameter, are case sensitive. When adding a new clothing item, you have the option to omit parameters that you’re not interested in.
Example use:
Add a new dynamic clothing item
Dynamic clothing items are defined similarly to other clothing items, but with an additional tracking parameter. This tracking parameter uses an idiomatic prefix syntax to distinguish between different expected tracking states, which are as follows:
- (No prefix) – State check: This straightforward check doesn’t involve file lookahead, which means it won’t detect additional files for variants. Its purpose is to function as a simple on and off toggle.
- ? (Question mark) – Lookahead: It displays a compatible image if one exists and the currently tracked object is worn, or the default image if the compatible image does not exist. It shows None if the tracked item is not worn.
- ! (Exclamation mark) – Negative lookahead: It displays a null image if the currently tracked object is worn, or the default image otherwise.
- + (Plus sign) – Chainload: This functionality allows the dynamic clothing item to display a compatible image specifically for the currently tracked variant of the dynamic clothing item. It can be thought of as a tracker that tracks another tracker, enabling nested tracking capabilities.
- ?= (Question mark and equal sign) – Lookahead item: This feature functions similarly to the default lookahead, but it enables tracking of a specific item ID. If an image with the specified ID exists, and the tracked item is currently worn, it will be displayed; otherwise, the default image will be shown.
- != (Exclamation mark and equal sign) – Negative lookahead item: This feature serves as a negative lookahead for a particular item ID. If the currently tracked item ID is worn, it displays a null image; otherwise, it shows the default image.
- += (Plus sign and equal sign) – Chainload item: This functionality operates similarly to the default chainload function, but with the added capability of tracking other dynamic items and their respective states.
A few things to note:
- In most cases, a default image can also be a null image.
- Each variant must have an identical number of image files.
- Chainload functions are computationally expensive, especially if multiple dynamic clothes are involved.
- When tracking a multislot type item, only the first returned result will be utilized to determine the appropriate image.
The file structure for a dynamic hat item that tracks the hair would be as follows:
└─── ExampleMod
├─── manifest.json
├─── script.rpym
├─── script.rpymc
├─── logo.webp
└─── characters
└─── hermione
└─── poses
└─── default
└─── clothes
└─── headgear
└─── examplemod_hat
└─── default
├─── 0.webp
├─── 1.webp
└─── outline.webp
└─── updo
├─── 0.webp
├─── 1.webp
└─── outline.webp
└─── bio_hair
├─── 0.webp
├─── 1.webp
└─── outline.webp
Example use:
Add a new makeup/piercing item
The process of adding makeup items, or facial piercings, is fundamentally similar to adding any other dynamic clothing item. The primary distinction is the use of facial parts rather than clothing types as a tracking parameter, which necessitates the addition of images for every tracked expression variant.
The second notable difference is that DollMakeup doesn’t support any extra syntax in the tracking parameter to prevent performance overhead. This limitation is due to the frequent updates of expressions, as they can be changed after each interaction, unlike clothes.
As an illustration, if you intend to add a lipstick for Hermione, the file structure should be organized in the following manner:
└─── ExampleMod
├─── manifest.json
├─── script.rpym
├─── script.rpymc
├─── logo.webp
└─── characters
└─── hermione
└─── poses
└─── default
└─── clothes
└─── makeup
└─── examplemod_lipstick
└─── angry
└─── 0.webp
└─── annoyed
└─── 0.webp
└─── base
└─── 0.webp
Note the following:
- If an image file is missing for a facial expression, it will be replaced with a null image for that specific expression.
- If you plan to add a body or nose piercing, or any other item using only static layers, please consult the ‘Add a new clothing item‘ section.
Example use:
Add a new outfit
To add a new outfit, you need to start by creating one or more clothing items that will constitute the outfit group. It is essential to define outfits after the clothes to follow Python’s order of operation.
The Outfit class accepts the following parameters:
- group – A list containing references to the clothing objects that form the outfit.
- unlocked – Determines whether the outfit is unlocked by default.
- price – The price of the outfit in the clothing store. Assigning a non-zero value automatically adds the item to the clothing store.
- name – The name of the outfit displayed in the clothing store, if applicable.
- desc – An outfit description displayed in the clothing store, if applicable.
- schedule – A dictionary containing information about the outfit schedule.
There is no need to explicitly include the character name within the outfit constructor, as it will be automatically detected by scanning the first object from the outfit group. Similarly to clothing items, you have the option to omit parameters that you don’t need.
Example use:
Add a new bodypart
Incorporating a new body part, such as additional layers for breast sizes, is a straightforward process. Simply place the required files in the correct directory and define the corresponding object.
DollBodypart accepts the following parameters:
- modpath: File path of the mod folder, typically the mod’s name.
- name: The character’s name.
- categories: The main category and subcategory of the item to be displayed in the wardrobe. (If applicable)
- type: The item type.
- id: The item identifier, or in other words, the name of the folder where the images are stored.
- unlocked: Specifies whether the item is unlocked by default (True) or is unlocked through other means (False).
- level: The character’s level required to wear this cloth.
- zorder: The item’s z-order number, or None to use the default z-order for the slot.
- blacklist: A list of strings containing clothing types incompatible with this item.
File Structure:
└─── ExampleMod
├─── manifest.json
├─── script.rpym
├─── script.rpymc
├─── logo.webp
└─── characters
└─── hermione
└─── poses
└─── default
└─── bodyparts
└─── chest
└─── bigbreasts
└─── skin.webp
Example use:
Add a new character
Incorporating a new side character to add it in a story is one thing. However, introducing an interactive character with a fresh storyline, interfaces, and seamless integration with existing systems is a complex process that demands understanding the game’s internal mechanics. In this guide, we’ll focus on the fundamental aspects to help you gain a better understanding of the procedure. Keep in mind that while we strive to be comprehensive, we won’t cover everything, as this extends beyond the scope of the typical modding scenario.
To begin the process of adding a new character, you must first define a new doll object, set up the body frame, and establish the default body group, which is internally coded as a DollOutfit instance.
default her_frame_default = DollBodypart("hermione", ("hidden", "frame"), "frame", "default")
default her_body_default = DollOutfit([her_frame_default], hidden=True)
Although the above code appears simple at a glance, its back-end is intricately complex, performing various tasks to facilitate the integration of the new character into the internal systems such as:
- Character Transition and Transforms
- Wardrobe
- Character Studio
- Cheats
- Inventory
- Expression Editor
- Linting
- Updater
- Various character methods
Automatic character addition is available in some systems, but not all can make use of it. In such cases, manual coding of extensions becomes necessary for specific functionalities, like summon methods, map methods, character menus (such as statistics), and hooks for gifts, say statements, among other things.
Methods
equip()
Takes DollCloth, DollClothDynamic, DollMakeup, DollBodypart or DollOutfit object reference or a list of references to equip.
Note: This method adds the object to the character, modifying the current outfit.
Example use:
unequip()
Takes a string of the doll object type, or a list of types to unequip, or one of the following:
- all
- clothes
- bodyparts
- makeup
Note: This method removes the object from the character, modifying the current outfit.
Example use:
wear()
Takes a string of the doll object type, or a list of types to wear (unhide), or one of the following:
- all
- clothes
- bodyparts
- makeup
Note: Unlike the equip() method, this method does not modify the current outfit.
Example use:
strip()
Takes a string of the doll object type, or a list of types to strip (hide), or one of the following:
- all
- clothes
- bodyparts
- makeup
Note: Unlike the unequip() method, this method does not modify the current outfit.
Example use:
set_cum()
Takes a keyword argument and a value containing the position of the cum layer on the body.
Note: Please be aware that each character can possess distinct layers with unique placements, for each pose. For a comprehensive list of available layers, you can find them in the game files under the following path:
Example use:
# or
hermione.set_cum("heavy")